Migrating project management software from Redmine to GitLab
Migrating tickets, comments, roadmaps and wiki pages from Redmine to GitLab is a lot of work if you do it by hand. Fortunately, one can automate this process by using the Redmine to GitLab migrator.

At Drift+Noise we’ve decided to use GitLab in preference to Redmine. Although Redmine had served us very faithfully for several years, we found the Git integration as well as the merge request and code review functionality in GitLab to be sufficiently valuable to justify migrating between the systems.
Since we already had a lot of data stored in our Redmine instance, one necessary prerequisite of the migration was the availability of an automated migration tool which would copy historical data across to the new GitLab instance (I mean, who wants to copy by hand discussions from old tickets from one system to another?). Luckily such a tool exists: the Redmine to GitLab migrator1.
Below I’m going to describe how to set up the Redmine to GitLab migrator, how to use it to migrate Redmine roadmaps, issues and wikis across to GitLab milestones, issues and wikis, as well as some of the gotchas I noticed while performing the migration.
For this discussion I’m going to assume that the Redmine and GitLab
instances are self-hosted. Theoretically the migration should work when
migrating data from a Redmine instance to projects hosted on gitlab.com,
however I haven’t tested that configuration.
Let’s go!
Initial setup
Since there are a couple of files that need to be used as configuration for the migration, it’s a good idea to create a directory for the migration you’re going to perform, e.g.:
$ mkdir redmine-to-gitlab-migration
$ cd redmine-to-gitlab-migration
Now that that’s set up, we can install redmine-gitlab-migrator.
Installing the Redmine to GitLab migrator
The redmine-gitlab-migrator project is written in Python, so it’s a good
idea to create and activate a virtual environment2 first before
running the installation:
$ virtualenv --python=/usr/bin/python3 venv
$ source venv/bin/activate
Now we can install the package with pip:
$ pip install redmine-gitlab-migrator
After the installation has completed successfully, the migrate-rg command
will be available. To get quick help about this command, run it with the
--help option:
$ migrate-rg --help
usage: migrate-rg [-h] {issues,pages,roadmap,redirect,iid,delete-issues} ...

positional arguments:
  {issues,pages,roadmap,redirect,iid,delete-issues}
    issues
    pages
    roadmap
    redirect
    iid                 Should occur after the issues migration
    delete-issues       Delete all issues in the gitlab repo

optional arguments:
  -h, --help            show this help message and exit
The subcommands also have their own help output, just pass the --help
option to the appropriate subcommand, for example:
$ migrate-rg issues --help
Reading the docs considered useful
Note that reading the project’s README is a very good idea before starting with an actual migration. It contains lots of information about the process and what the automatic migrator can and cannot do. This is important, because some of the features of (and concepts in) Redmine aren’t available in GitLab, therefore it’s a good idea to be clear about whether or not this is the right tool for the job you’re trying to perform.
In order for the migration to work, it’s not necessary for the Redmine and GitLab instances to be running on the same host (in fact, it’s probably better if they aren’t). The data migration takes place between the Redmine and GitLab REST APIs (across the network), hence one only needs to create (or simply look up) the API key for a user with appropriate privileges on Redmine and on GitLab.
Setting up the Redmine API
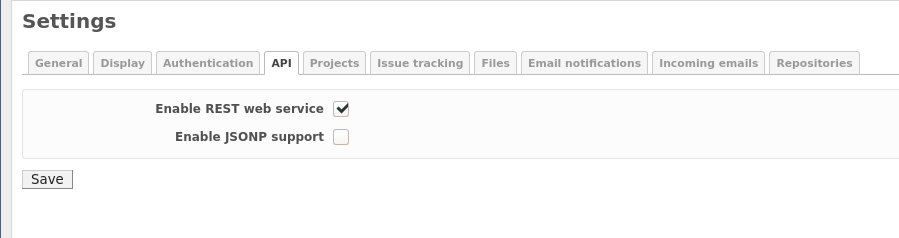
Since the data is migrated across the REST APIs of the two services, you will need to ensure that the REST web service is activated. To activate this, go to the Administration link at the top of the page3; then choose the Settings link; and finally choose the API tab. Now ensure the Enable REST web service checkbox is checked.
Now navigate to your user account by clicking on the My Account link in the top right-hand corner of the page. When you visit your My Account page you should find the heading API access key in the panel to the right. Click on Show to see the key:
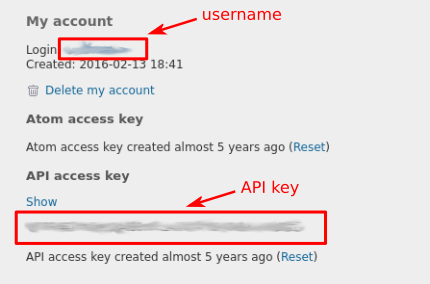
Copy this information somewhere for safe keeping; you’ll need it when
running the migrate-rg command.
Setting up the GitLab API
It’s also necessary to ensure that access to the API on GitLab is set up correctly and that your user has the correct privileges.
Note that you need be an “Owner” of the project4 you’re migrating to on GitLab, otherwise you’ll get the following error:
    raise ValueError('Could not get project_id for path_with_namespace: {}'.format(path_with_namespace))
ValueError: Could not get project_id for path_with_namespace: <group-name>/<project-name>
which admittedly isn’t very helpful in debugging the situation, nevertheless what the message is trying to say is that the user accessing the API endpoint doesn’t have enough privileges to access everything it needs to, hence the need for the user to have the role permission of “Owner” on the GitLab project.
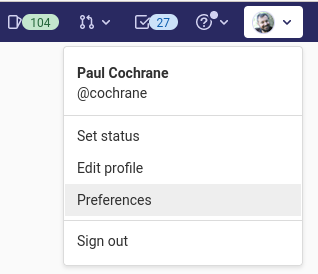
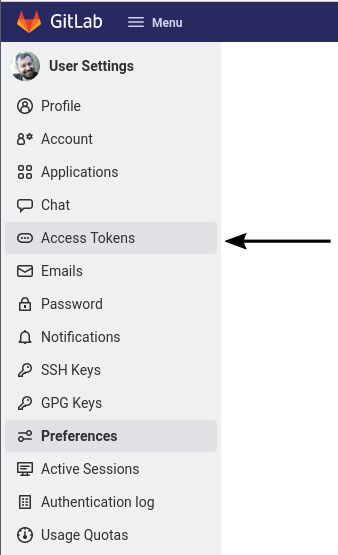
To enable access to GitLab, it’s necessary to create an access token with the appropriate permission scopes. To do this, go to your avatar at the top right-hand corner of the page and select Preferences from the menu.
Then choose Access Tokens from the left hand sidebar.
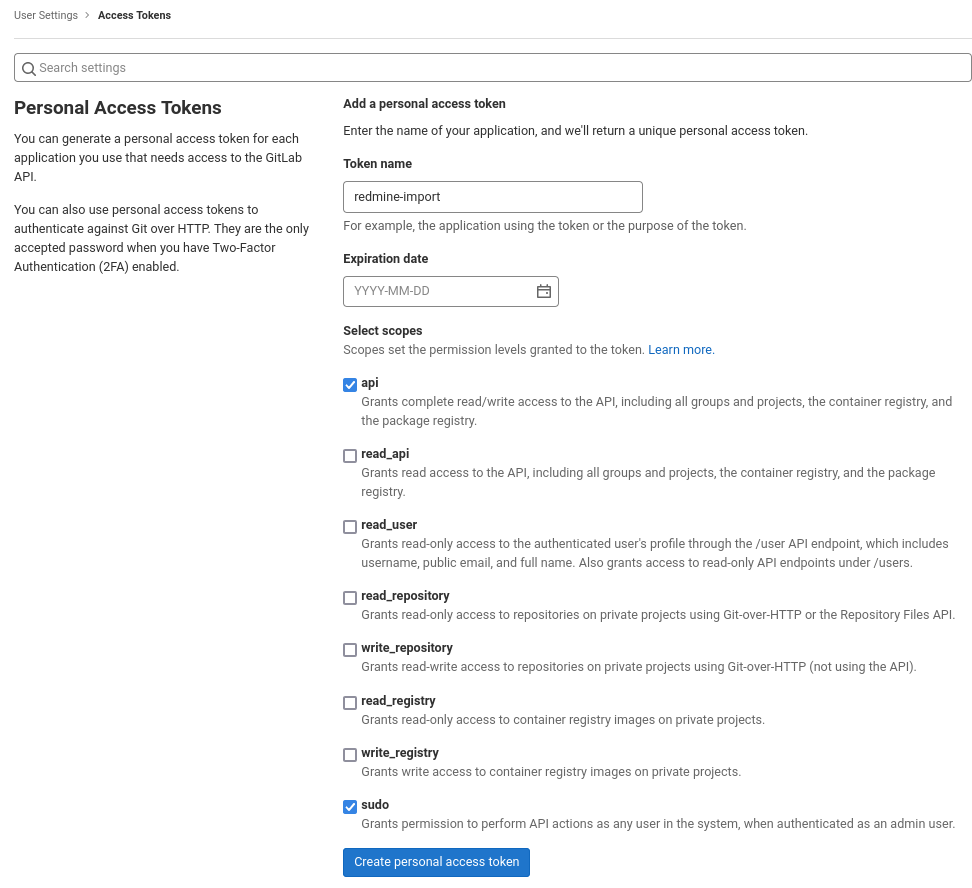
You will now be on the page to add a personal access token. Give the access
token a name (e.g. redmine-import; specify api and sudo for the scopes
(you will need to access the GitLab API, hence api, and the access token
will need administrative privileges in order to carry out its tasks, hence
sudo) and then click on the Create personal access token button.
The access token will now be displayed; copy and paste this somewhere for
safe keeping since you won’t be allowed to view it again, but you will
need it in order to run the migrate-rg command.
Create the user account map file
User accounts in Redmine need to be mapped to their equivalent accounts in GitLab so that user information in tickets, comments, etc. can be converted correctly. Therefore, the user accounts need to be created in GitLab before the migration takes place. For instance, if a user is called “mihipeka” on the Redmine system, however uses the username “mihi” on GitLab, the mapping file will allow the migrator to correctly assign tickets, comments, etc. from Redmine into the appropriate issues, comments etc. for each mapped user in GitLab. Note that any references to users found in Redmine but that are unknown in GitLab will be automatically assigned to the GitLab Admin User in GitLab by the Redmine-GitLab Migrator.
Be careful with, however, deactivated accounts: if your user exists on both Redmine and GitLab, however has been deactivated, you will get read errors when migrating issues, therefore don’t map deactivated users in the map file.
The map file is a yaml-formatted file with the keys being the Redmine usernames and the values being the respective GitLab usernames. E.g.:
alice: alice
bob: robert
clair: claire@example.com
Give this file a sensible name (something like redmine-gitlab-user-map.yml
should do) because you’re going to be referencing this file in almost all
migrate-rg command calls.
Danger Will Robinson! My GitLab is spamming me!
One point to realise: the projects that you’ve set up in GitLab will have
notifications turned on. This means that for each new issue (or change to
an issue) an email will be sent to each user associated with that issue. In
normal operations that is probably something that you want. However, when
migrating potentially hundreds of issues from Redmine to GitLab, this will
create a lot of notifications, so it’s a very good idea to turn off
email notifications from your GitLab server otherwise you will spam
yourself and could run into the situation that the email address your GitLab
server uses to send notifications will be blocked by your internet service
provider. It is very unlikely that you want to get into this situation as
you probably want to keep sending notification emails after having migrated
from Redmine to GitLab ![]() .
.
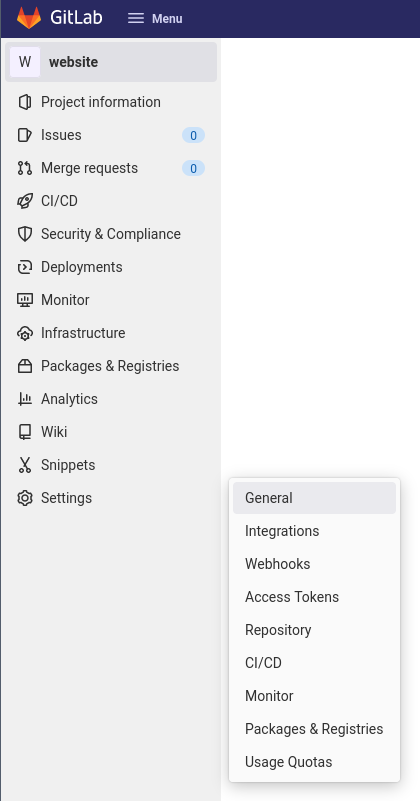
One can turn off notifications on a project-by-project basis and since one can only migrate one project at a time, this is the way to go. To do this, go to the main project page in GitLab and select Settings from the left-hand navigation bar. Then select General from the subsequent menu.
On the general settings page for the project, scroll down to the Visibility, project features, permissions section and click on the Expand button to show all of the options.
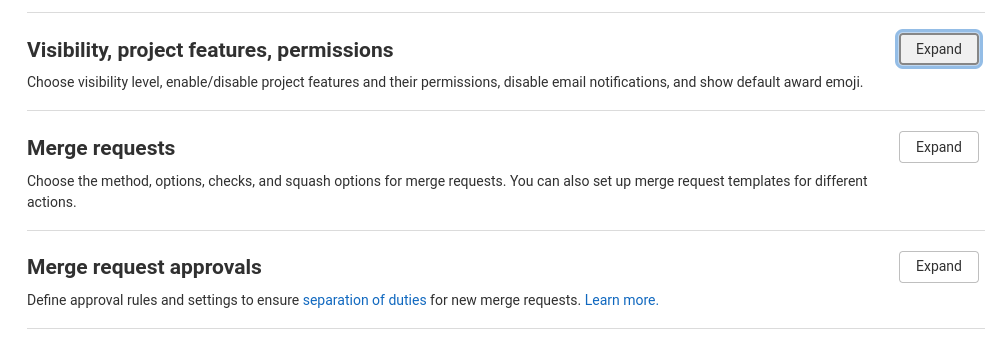
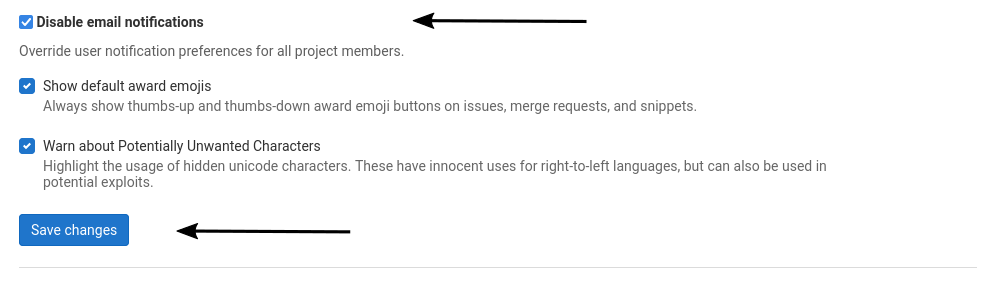
Close to the bottom of this section you will find a checkbox Disable email notifications. Check this box and click on the Save changes button to save the changes.
Now when you migrate your issues you shouldn’t produce any unnecessary emails.
Of course, if you want to be really, really sure, you could turn off your
mail relay, by e.g. turning off the postfix service5:
$ sudo service postfix stop
Note that after you’ve migrated everything you will need to turn the
postfix service back on and will need to turn email notifications back on
so that your project works as normal.
Migrate Redmine roadmap versions to GitLab milestones
Now we’re at the point that we can migrate data from Redmine to GitLab, and it’s now especially important that one has read the Redmine to GitLab project’s README; in particular the initial comment in the Migration process section:
This process is for each project, order matters.
If you use roadmaps in Redmine you can migrate the roadmap versions to
GitLab milestones with the roadmap subcommand to the migrate-rg
command. If you don’t use roadmaps, it’s safe to skip this step and move on
to migrating issues.
The roadmap subcommand requires the Redmine API key that was set up in the
Setting up the Redmine API section, the
GitLab access token that was created in the Setting up the GitLab
API section, the URL of the Redmine project to
be migrated, as well as the URL of the GitLab project into which the data is
to be migrated. The general form of the command looks like this:
$ migrate-rg roadmap \
    --redmine-key '<redmine-api-key>' --gitlab-key '<gitlab-api-key>' \
   https://url/of/redmine/project https://url/of/gitlab/project
and you can get more detailed information about the command by using the
--help option:
$ migrate-rg roadmap --help
usage: migrate-rg roadmap [-h] --redmine-key REDMINE_KEY --gitlab-key
                          GITLAB_KEY [--check] [--debug] [--no-verify]
                          redmine_project_url gitlab_project_url

positional arguments:
  redmine_project_url
  gitlab_project_url

optional arguments:
  -h, --help            show this help message and exit
  --redmine-key REDMINE_KEY
                        Redmine administrator API key
  --gitlab-key GITLAB_KEY
                        Gitlab administrator API key
  --check               do not perform any action, just check everything is
                        ready
  --debug               More output
  --no-verify           disable SSL certificate verification
Before migrating the roadmap in earnest, it’s a good idea to first check
that everything works nicely by using the --check option:
$ migrate-rg roadmap --check \
    --redmine-key '<redmine-api-key>' --gitlab-key '<gitlab-api-key>' \
   https://url/of/redmine/project https://url/of/gitlab/project
This doesn’t actually migrate any data; it just checks to make sure that everything will work as soon as you run the command for real. Running this command gives output similar to this:
INFO: Redmine project contains versions...
INFO: Redmine project contains versions... OK
INFO: Would create version {'title': 'Version 1.0: Tobermory', 'description': 'Initial public release\n\n*(from redmine: created on 2016-04-29)*'}
INFO: Would create version {'title': 'Version 1.1 Bungo', 'description': 'Remove rubbish from Common\n\n*(from redmine: created on 2016-03-30)
What’s nice about this output is that it tells you what it “would” do, which is nice as it helps one to decide whether or not to run the actual migration.
To actually perform the operation, remove the --check option. As an
example, consider a Redmine project called main-website being migrated to
the GitLab project called website, which is in a group called
public-web. This would result in a migrate-rg command that looks like
this:
$ migrate-rg roadmap \
    --redmine-key '<redmine-api-key>' --gitlab-key '<gitlab-api-key>' \
   https://redmine.server.example.com/projects/main-website \
   https://gitlab.server.example.com/public-web/website
The output isn’t as verbose as with the --check option, however contains
much of the same information:
INFO: Redmine project contains versions...
INFO: Redmine project contains versions... OK
INFO: Initial public release
INFO: Remove rubbish from Common
If you visit the project page on the GitLab instance (for the example here,
https://gitlab.server.example.com/public-web/website) then you should find
that the migrated roadmap versions have been created on the Milestones
page. To get to the Milestones page from the main project page, hover
your mouse over on the Issues link in the sidebar on the left-hand side
of the page. In the submenu that appears, you will see the option
Milestones; click on this link to see the newly-created project
milestones.
Migrate Redmine tickets to GitLab issues
Migrating issues is much the same as migrating roadmaps; the main change is that the user account mapping file is used to ensure that issues (and the comments in discussions within issues) are assigned to the appropriate user.
As with the other commands, there’s a --help option which gives more
details; this time with many more options:
$ migrate-rg issues --help
usage: migrate-rg issues [-h] --redmine-key REDMINE_KEY --gitlab-key
                         GITLAB_KEY [--check] [--debug] [--no-verify]
                         [--closed-states CLOSED_STATES]
                         [--custom-fields CUSTOM_FIELDS]
                         [--user-dict USER_DICT] [--project-members-only]
                         [--keep-id] [--keep-title] [--initial-id INITIAL_ID]
                         [--no-sudo] [--archive-account ARCHIVE_ACC]
                         redmine_project_url gitlab_project_url

positional arguments:
  redmine_project_url
  gitlab_project_url

optional arguments:
  -h, --help            show this help message and exit
  --redmine-key REDMINE_KEY
                        Redmine administrator API key
  --gitlab-key GITLAB_KEY
                        Gitlab administrator API key
  --check               do not perform any action, just check everything is
                        ready
  --debug               More output
  --no-verify           disable SSL certificate verification
  --closed-states CLOSED_STATES
                        comma seperated list of redmine states that close an
                        issue, default closed,rejected
  --custom-fields CUSTOM_FIELDS
                        comma seperated list of redmine custom filds to
                        migrate
  --user-dict USER_DICT
                        file path with redmine user mapping to gitlab user, in
                        YAML format
  --project-members-only
                        get project members instead of all users, useful for
                        gitlab.com
  --keep-id             create and delete empty issues for gaps, useful when
                        no ssh is possible (e.g. gitlab.com)
  --keep-title          migrate issues with same title, useful when no ssh is
                        possible (e.g. gitlab.com) and don't need to keep id
                        (faster)
  --initial-id INITIAL_ID
                        Initial issue ID, to skip some issues
  --no-sudo             do not use sudo, use if user is not admin (e.g.
                        gitlab.com)
  --archive-account ARCHIVE_ACC
                        if account doesn't exists in GitLab use this account
                        as default
It’s a very good idea to run the issues command with the --check option
first to ensure that API authentication etc. works correctly.
$ migrate-rg issues --check --keep-title --user-dict redmine-gitlab-user-map.yml \
   --redmine-key '<redmine-api-key>' --gitlab-key '<gitlab-api-key>'
   https://url/of/redmine/project https://url/of/gitlab/project
Note that I’ve also added the --keep-title option here. If one omits this
option, then all of the GitLab issues will have a text like -RM-1-MR-
prepended to the title. Personally, I found this extra information in the
issue title not to be that helpful, hence the use of the --keep-title
option which ensures that the original title from Redmine is migrated to
GitLab.
if you’ve got a lot of issues, this command can take a while to get started and can take a while to run once output is available. Once output does appear, you’ll see something along these lines:
INFO: Getting redmine issues
INFO: Converting issues
INFO: Creating gitlab issues
INFO: Would create issue "Go for a spin on a windy day" and 12 notes.
INFO: Would create issue "Repair Great Uncle Bulgaria's rocking chair" and 2 notes.
INFO: Would create issue "Invent telephone with cans and string" and 9 notes.
showing you what the system would do, had the --check option not been set.
Now it’s time to go crazy and run the command for real:
$ migrate-rg issues --keep-title --user-dict redmine-gitlab-user-map.yml \
   --redmine-key '<redmine-api-key>' --gitlab-key '<gitlab-api-key>'
   https://url/of/redmine/project https://url/of/gitlab/project
The output now mentions the issue number of the issue it is creating, however no longer mentions how many notes were created as part of the issue.
INFO: Getting redmine issues
INFO: Converting issues
INFO: Creating gitlab issues
INFO: #10 Go for a spin on a windy day
INFO: #11 Repair Great Uncle Bulgaria's rocking chair
INFO: #12 Invent telephone with cans and string
What if something goes wrong when migrating issues?
Not everything in life goes to plan and it’s entirely possible that something goes awry when migrating issues, especially when migrating a lot of issues. What should one do?
Simply running the issues subcommand again is not a good idea as this
will create duplicate issues on the destination GitLab system. What’s
probably best is to delete the issues you created, work out what was going
wrong at the point where things stopped working and then to repeat the
issues subcommand, but this time with the --debug flag to get more
information about what went wrong.
Let’s imagine that something went wrong when migrating issues and only half
of the issues were migrated before the command returned with an error. We
want to delete the issues that were migrated so that we can start again from
a clean state. To do this, use the delete-issues subcommand:
$ migrate-rg delete-issues --gitlab-key '<gitlab-api-key>' \
    https://url/of/gitlab/project
Note that we only have to specify the GitLab project URL and the relevant GitLab API key as this operation only interacts with the GitLab server.
An oddity of the delete-issues subcommand is that it won’t produce any
output (in contrast to the other subcommands), so don’t be surprised to just
see your command prompt simply reappear after having run the command. You
can, however, force it to show what it’s doing in much detail by passing the
--debug option.
Now run migrate-rg issues with the --debug flag to get all of the
available debugging information:
$ migrate-rg issues --debug --keep-title --user-dict redmine-gitlab-user-map.yml \
   --redmine-key '<redmine-api-key>' --gitlab-key '<gitlab-api-key>'
   https://url/of/redmine/project https://url/of/gitlab/project
This will produce a lot of output due to the --debug flag, however this
is a good thing if you’re trying to work out why migration of issues didn’t
work as expected.
Debugging migration failures are highly context dependent, so unfortunately I can’t give any guidance on how to proceed exactly. Sorry about that!
Migrate wiki pages
The last thing to do is to migrate any wiki pages that you might have in your Redmine project across to the equivalent space on GitLab.
First it’s necessary to create the wiki in GitLab. This will create a new Git repository, usually with a name of this form:
<group-name>/<project-name>.wiki.git
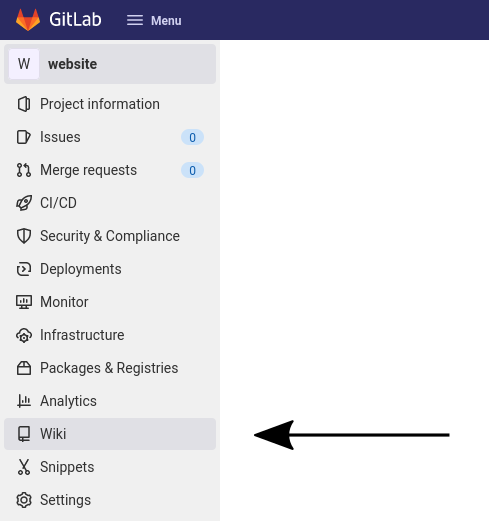
To find the Git repository associated with your wiki, click on the “Wiki” link in the left-hand sidebar on your project’s page in GitLab.
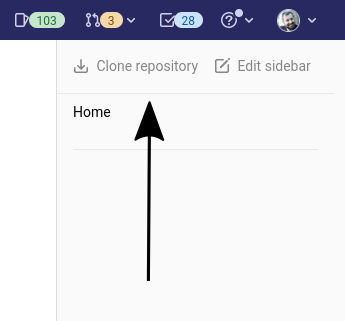
In the upper-right hand corner of the page there is a link called “Clone repository” (it’s not immediately obvious, so don’t worry if you don’t find it straight away).
Now you will be presented with details of how to clone the wiki’s git repository.
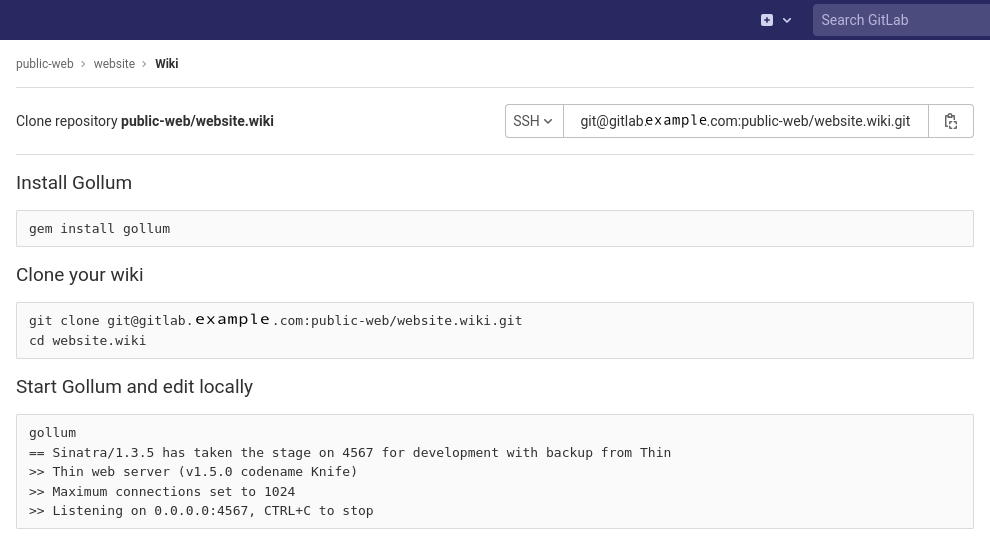
The only information that is really needed here is the URL to clone which is
shown both at the top right-hand side of the page as well as within the
“Clone your wiki” section of the main text. I’ve never needed to use the
gollum program to edit my wiki pages,
however your mileage may vary. If you want to edit files locally and would
like to see how they will look when viewed on GitLab, using gollum might
be a good idea.
We now just need to clone the wiki’s repository, which we can do with a command of this form:
$ git clone git@<gitlab-server>:<group-name>/<project-name>.wiki.git
For the example website project here, this would be:
git clone git@gitlab.example.com:public-web/website.wiki.git
Note that if your project name contains underscores, then these will be converted to hyphens when the wiki Git repository is created.
In contrast to other migrate-rg subcommands, migrating wiki pages
doesn’t happen directly from Redmine to GitLab (for instance as in the
case of migrating roadmaps or issues). The migration can only occur from a
remote Redmine system to a local Git repository, hence the need to clone the
wiki’s repository to your local system.
Note also that (unlike the other subcommands) the --check option doesn’t
seem to work with the pages subcommand (which migrates wiki pages) and
hence all changes will be fetched and added to the local repository even if
you use the flag on the command line.
To migrate the wiki pages, use the pages subcommand of migrate-rg, which
has this form:
$ migrate-rg pages --redmine-key '<redmine-api-key>' \
    --gitlab-wiki /path/to/cloned/gitlab/wiki/ https://url/of/redmine/project
Running this command on our example website project we have:
$ migrate-rg pages --redmine-key '<redmine-api-key>' \
    --gitlab-wiki /path/to/website.wiki/ \
    https://redmine.server.example.com/projects/main-website/
which gives this output:
Collecting Wimbledon_Common
Collecting Wombles_and_Ladders
Collecting Womblegarten
Converting home (Wimbledon_Common version 1)
Converting home (Wimbledon_Common version 2)
Converting home (Wimbledon_Common version 3)
Converting Wombles_and_Ladders (Wombles_and_Ladders version 1)
Converting Wombles_and_Ladders (Wombles_and_Ladders version 2)
Converting Womblegarten (Womblegarten version 1)
Converting Womblegarten (Womblegarten version 2)
Once the migration is complete (files will be created locally for the wiki pages and changes to those files will be made as commits to the repository) you can simply push your changes to the upstream repository for the wiki which will then update the wiki automatically in your GitLab instance, for example:
$ cd /path/to/website.wiki/
$ git push
Be careful though: the automated migration will overwrite any wiki pages
previously created in your GitLab project (e.g. those created via the editor
in the GitLab web interface) which have the same name as those being
migrated. Most likely, however, only the home.md page will be affected.
Hence you’ll need to put back any information that used to be on this page
after the migration is complete.
One other issue is that the migration program assumes that the Redmine wiki pages are in Textile format (even if they were already written as Markdown in Redmine). Since it is possible to use Markdown in Redmine wikis and because all of the Markdown will be assumed to be Textile, all Markdown formatting will be escaped, meaning that one needs to fix the formatting of the GitLab wiki pages once the automated migration has taken place.
For instance, a Markdown-formatted heading from Redmine like this:
### Great Uncle Bulgaria's Keep Fit Lesson
will be converted to:
\#\#\# Great Uncle Bulgaria's Keep Fit Lesson
so you’ll have some editing to do (mostly just removing the backslashes) in order to get the formatting back to how it was originally.
A further issue to be aware of when migrating wiki pages from Redmine to GitLab is that any images that had been uploaded to the Redmine wiki won’t be migrated automatically, therefore this needs to be done by hand after the automated migration has been completed.
Wrapping up
And that’s basically it. Now it’s just a matter of repeating the above steps for each project that you want to migrate from Redmine to GitLab.
I hope that the information presented here was helpful! If you have any comments, questions or feedback, feel free to ping me on Mastodon or drop me a line via email.
-
I used version 1.0.3 when writing this post. ↩
-
A Python virtual environment allows you to install and use packages in a local, encapsulated environment without requiring the packages to be installed system-wide. This way the package version requirements of separate projects do not conflict with one another. ↩
-
In this discussion the user performing these tasks has to have administrative privileges on the Redmine system; you won’t see the Administration link if you don’t have the correct privileges. ↩
-
Only single projects are migrated with the
migrate-rgcommand, hence we consider migrations on a per-project basis. ↩ -
Assuming, of course, that you use Postfix for your mail relay. ↩
Support
If you liked this post and want to see more like this, please buy me a coffee!